Piecing Together the Music: Conserving an Ancient Egyptian “Whistle”
The first object of my conservation career, which I worked on in my first year at Cardiff, was an intriguing “whistle” from The Egypt Centre in Swansea. A beautiful object, consisting of a combination of copper, ivory, lapis lazuli, and adhesives from an unknown number of previous repairs. It was also broken into three pieces. It was such a fragile object, with all its different component materials, that every stage of the process needed to be thoroughly considered.
What was the goal the project set out to achieve?
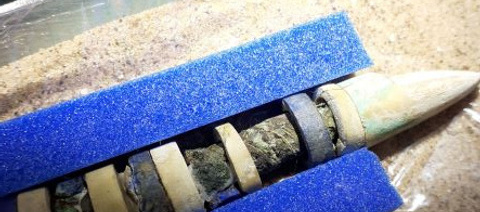
In my first weeks of studying at Cardiff, I was assigned to work on an ancient “whistle” from The Egypt Centre in in Swansea. It was a small, but complicated piece, comprising of a central copper/copper alloy tube, surrounded by alternating rings of ivory and lapis lazuli, and with an ivory mouthpiece, and a number of adhesives from previous restorations. It had also broken into three pieces.
The “whistle” is a popular piece at The Egypt Centre, so it was important that the object would still be able to be displayed, as well as for the joints to be strong enough to allow it to be gently handled for education, although this was only to be for movement from its storage to a table. Even after conservation, it is still too fragile to be substantially handled.
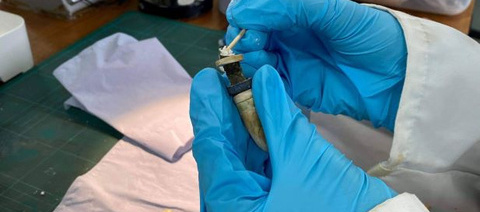
I was the second Conservation Practice student to work on the object at Cardiff, after Katherine List, who carried out material analysis and surface cleaning of old adhesives before I was assigned the object. My priority with its treatment was thus to reattach the three pieces into a single object, allowing for a sensitive repair that enabled the “whistle” to be (infrequently) handled. As the central copper tube was also showing signs of corrosion, it was important to establish that the metal was stable before making any attempts at a repair. I also had to contend with an old fill in the centre of the middle piece, which was, in fact, holding the copper tube together.
What did I do?
I started by researching copper corrosion and bronze disease, and after a while, I was satisfied that the even, green crust on the copper tube was most likely malachite rather than a chloride product. I then started thinking about how to create a strong, structural join between the “whistle” pieces. I thought about using a dowel and adhesive or filler, or a filler on its own. Throughout the process, I had the support of my course leaders, Phil Parkes and Professor Jane Henderson, to talk through my ideas, and with this I decided that a filler would be a safer option for several reasons: it could be packed in to the whole interior of the tube rather than leaving space to move around in, it was less likely to scratch the tube, and if it were to fail, it would break rather than the surrounding object. After some tests, I decided on Paraloid B-72 40% w/v in acetone with microballoons.
As Katherine had previously worked on the “whistle”, I was informed by results from analysis done last year, which had identified an adhesive as poly vinyl-acetate/vinyl-chloride, as well as a bituminous substance on the exterior of the tube. Once the pieces had been filled and attached, and the join reinforced with more filler and B-72 where necessary, I could then use more acetone to remove some remaining pieces of old adhesive from the surface. I then in painted the fill with acrylic paint. Lastly, I consolidated the bituminous substance , as small pieces had flaked off the “whistle” during my work on it. For this, I used Paraloid B-67 10% w/v in acetone, due to its resistance to yellowing and 50°C glass transition temperature. Finally, I attached the label inside the end ring, and the project was complete.
What was the outcome?
After treatment, the “whistle”, while still fragile, has been reassembled into a single, displayable object. It still needs careful handling and support from beneath, but it is stable enough to be handled for short periods of time and be displayed to the public.
The joint work of two consecutive conservation students also revealed information about the “whistle” through analysis. In my predecessor’s work, Scanning Electron Microscopy, X-Ray Diffraction and Fourier Transform Infrared Spectroscopy (FTIR) were consistent with what the materials were thought to be – lapis lazuli, ivory, copper and bitumen, as well as the yellowing adhesive that I mentioned above. The X-Rays that had previously been taken by Katherine were also invaluable to my treatment, because they showed the condition of the tube within the rings, and informed me that the middle piece was being held together by a grey substance from a previous repair, and to attempt to remove it risked the whole tube falling apart. I did my own FTIR analysis on the grey substance, to ascertain what it was, and whether it would be able to remain where it was, or if it was causing more damage in being there. My results suggested a proteinaceous substance, such as collagen or gelatin, along with another substance, which may indicate plant gum or plaster of paris. The results weren’t conclusive, but they were enough to tell me that it was definitely safer to leave the grey fill where it was.
What did I learn?
The “whistle” has been the first object that I have ever worked on as a conservator, so there was a lot to learn from it, both from the object itself and the thought processes involved in conserving it. I started the process with research, looking for parallel cases, and guidance for how to approach the problem, but every object is different, and I soon found that not all answers could be found in the literature, especially for such a unique object. This is where research combines with mechanical skill, experience, observation, judgement, and a level of intuition to solve the unique problems that may arise with unique objects. I found that my experience in the creative arts greatly helped me in ways that might not be immediately obvious, such as knowing when to go no further with a particular action. Working on the “whistle” also made it clear how important it is to gain hands-on experience with objects when training as a conservator, for precisely the reasons mentioned above – there is only so far that theory can go when conserving an object.
Conservation is a challenging process – there are so many threads of thought leading to different priorities and considerations of what actions to take, and what materials to use. I started this process with research, which continued to serve me well throughout, but I also learned the importance of intuition and judgement when balancing parts of a project and dealing with issues as they arise.


